Hawkhost cPanel Tutorial For Beginners

Hawkhost cPanel Tutorial For Beginners
If you’re new to web hosting, the first thing you’ll notice about most hosting accounts is that they come with a control panel. Hawkhost uses cPanel, a popular, user-friendly dashboard that lets you manage your website, domains, email, files, databases, and security—without needing to understand server commands.
This guide walks you through the basics of cPanel step by step. By the end, you’ll know where the important settings are, how to upload your site, manage domains and email, and handle common tasks like creating databases or installing an SSL certificate.
Getting into your Hawkhost cPanel
After you purchase hosting from Hawkhost, you’ll receive login details (usually via email). Typically, you’ll log in through a URL that looks like:
yourdomain.com:2083(for a standard SSL login)yourdomain.com:2083oryourdomain.com:2087(varies by server setup)
If you were given a direct cPanel link, use that—Hawkhost will provide the exact address.
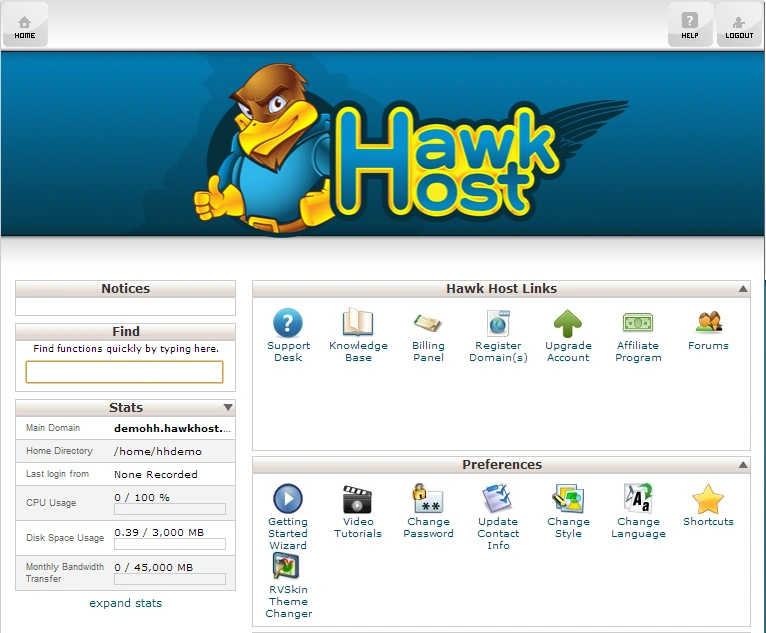
Once you log in, cPanel will show a dashboard with different sections. The layout can look a little different depending on your Hawkhost plan, but most users will see the same core tools.
Understanding the cPanel layout (what everything means)
At a high level, cPanel is organized into blocks:
- Files: Upload and manage website files
- Domains: Manage domain redirects, subdomains, and DNS-related tasks
- Email: Create email accounts and manage email forwarding/filters
- Databases: Create and manage MySQL databases and users
- Security: SSL, password protection, and basic security settings
- Software / Apps (if available): Install scripts like WordPress (often via Softaculous)
- Metrics: View bandwidth, visitor statistics, and logs
Don’t worry if you don’t use every section right away. Most beginners only need a few areas to launch a website.
Step-by-step: Upload your website files
If your website is made of HTML pages, a static site, or a custom project, you’ll usually upload files via File Manager.
Using File Manager
- In cPanel, go to Files → File Manager.
- Choose the correct directory for your website:
- For most sites, that’s usually public_html.
- Upload files:
- Click Upload.
- Select files or a
.ziparchive.
- If you upload a
.zip, you can extract it from the File Manager after uploading.
Common tip
If your index.html (or index.php) file isn’t loading in the browser, the issue is often because it’s not in the right folder (for example, not inside public_html), or because your domain isn’t pointing to the correct account.
Step-by-step: Install WordPress (if you’re building a CMS site)
If you want a WordPress website, the easiest route is usually an auto-installer (often Softaculous in cPanel).
Installing WordPress via the installer
- Look for Software or WordPress in your cPanel menu.
- Choose WordPress and click Install.
- Select the domain or folder you want to install into.
- Fill out basic details:
- Admin username and password
- Site name and description
- Choose optional settings like:
- Whether to create a new database automatically
- Preferred plugins (if the installer offers options)
- Confirm and click Install.
After the installation finishes, you’ll typically see your WordPress login link and admin credentials.
Managing domains and redirects
Beginners often wonder how to make a domain display a website properly. This is controlled using cPanel’s Domains area and DNS settings (depending on your setup).
Add a subdomain (optional)
For example, you might want blog.yourdomain.com.
- Go to Domains → Subdomains.
- Enter the subdomain name (like
blog). - Select the document root (usually it will create a folder automatically).
- Click Create.
Set up redirects
Redirects are useful when you want visitors to automatically go from one URL to another.
- Go to Domains → Redirects.
- Choose a redirect type:
- 301 (permanent)
- 302 (temporary)
- Select the source domain or path and target URL.
- Click Add Redirect.
If you’re not sure which redirect type to choose: for SEO-friendly permanent moves, 301 is usually the right default.
Email basics: Creating an email account
Email is one of the most common reasons people use cPanel. If Hawkhost provides email hosting, you can create mailbox accounts from here.
Create an email address
- Go to Email → Email Accounts.
- Click Add Email Account.
- Choose:
- Email address (like
[email protected]) - Domain
- Password (and you can generate a strong one)
- Mailbox quota (storage amount)
- Email address (like
- Confirm and click Create Account.
Access email
Depending on your setup, you can often access email using:
- Webmail (e.g., Roundcube or another interface)
- Or by configuring an email client (like Outlook, Apple Mail, or Thunderbird)
You’ll need the correct incoming/outgoing server details and ports, which Hawkhost typically provides.
Uploading and configuring SSL (HTTPS)
For modern websites, SSL is essential. HTTPS helps protect user data and improves trust.
In cPanel, SSL is usually available through Security → SSL/TLS (or sometimes a similar menu).
Common SSL options
- Auto SSL: Automatically issues and installs certificates when possible
- Install and Manage SSL: Manually handle certificate files if required
If your certificate is already active, your site should automatically load securely. If not, check whether Auto SSL is enabled and wait for it to complete (this can take a few minutes).
Working with databases (for WordPress and more)
If you install software like WordPress, you’ll typically use MySQL databases. cPanel makes this manageable.
Create a database
- Go to Databases → MySQL Databases.
- Create a new database name.
- Create a database user.
- Assign the user to the database and grant permissions.
For WordPress, the installer usually handles database creation automatically, but it’s useful to know what’s happening behind the scenes.
Important note
For security and convenience, always use a strong password for database users.
Backups: Protecting your site
Even if you’re just starting out, it’s wise to understand backups early. Accidents happen—files get overwritten, plugins break, or updates cause issues.
Depending on your Hawkhost plan, you may have backup tools in Files or Backup sections. If backups are available, check:
- How to download them
- How often automatic backups run
- Whether you can restore from within cPanel
If cPanel offers a full backup download, consider saving it to your computer so you have an extra safety layer.
Logs and troubleshooting (when something goes wrong)
When pages don’t load or the site behaves oddly, logs help you pinpoint the cause.
Look for sections like:
- Metrics (visitor stats)
- Errors or Raw Access Logs (depending on your setup)
- Logs in general
If you ever need to contact support, logs can be extremely helpful.
Guide: A quick “new website” checklist
If you want a simple plan for your first website in Hawkhost cPanel, follow this checklist:
- Log in to cPanel
- Upload your site to
public_html(or install WordPress) - Verify your domain is pointing to the correct hosting account
- Enable SSL/HTTPS
- Create email accounts (if you need them)
- Check backups and confirm what’s available
- Test everything:
- homepage loads
- forms work
- email sends/receives (if applicable)
Pros and Cons of Hawkhost cPanel (for beginners)
Pros
- Beginner-friendly interface: You can find most features without technical knowledge.
- One place for everything: Files, domains, email, databases, and security are all organized.
- Helpful installers: Auto-installers (like WordPress) reduce setup time.
- Common tasks are straightforward: Uploading files, creating email accounts, and setting up redirects are easy to follow.
Cons
- It can feel overwhelming at first: There are many features, and you don’t need to learn them all immediately.
- Some settings depend on DNS configuration: Domain-related tasks may require understanding where DNS is managed.
- Updates and plugin behavior can still be complex: Even with cPanel, managing applications (themes/plugins) may require some learning over time.
Wrapping it up
Hawkhost’s cPanel makes it possible to manage hosting tasks without diving into server technology. As a beginner, the key is to start with the essentials: logging in, uploading files (or installing WordPress), enabling SSL, setting up email, and learning where backups and logs live.
Once
🚀 Sign Up for hawkhost
Register for hawkhost here to receive a “lifetime discount” of up to 20%